| IMPORTANT: R-Studio is now available in the Nectar Application Catalog. Please refer to the Nectar Applications - R-Studio article instead. |
Using remote desktop in the NeCTAR cloud is the easiest way to start incorporating cloud computing into you research practice. The cloud can enable you to access your computing from anywhere, have it running 24/7, and provide a basic space to collaborate, whether your collaborators are down the hall, or many time zones away.
TPAC provides and maintains a number of server images that make ‘owning’ a remote desktop very easy. This document is about the TPAC RStudio image. By following the instructions below you can quickly have an RStudio remote desktop running in the NeCTAR cloud.
What you need
Aside from computer and network access, you will need to be an Australian Access Federation eligible researcher to access the NeCTAR cloud. You will also have to use key-pair security for your virtual machine authentication. Upon first NeCTAR cloud use, AAF eligible researchers are issued with a limited trial allocation that will do just fine for trialling the TPAC RStudio in the research cloud. If you need more resources, such as CPU, data storage space, or you need it for longer than your trial allocation, then you can request a NeCTAR allocation.
Launch an RStudio remote desktop
To launch an RStudio remote desktop follow these steps:
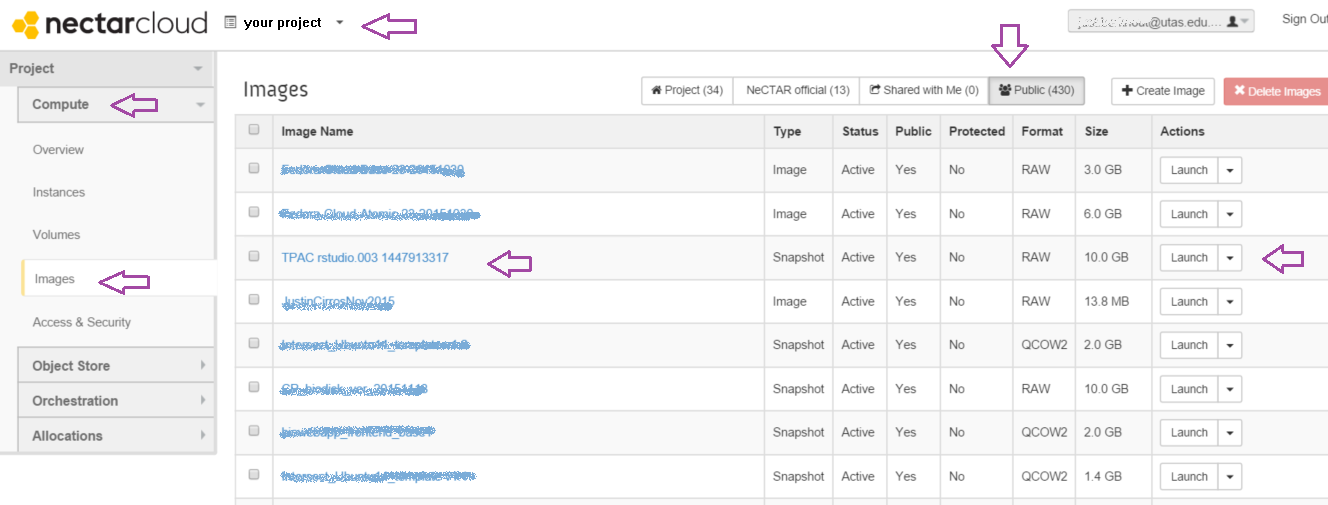
Log in to your NeCTAR Dashboard, and if you have access to more than one allocation, ensure that your project selector (top left on the Dashboard, is set to the project of your choice).
There are a few variations of launching a VM instance from an image, here we will navigate to images under Compute on the left hand side of the Dashboard. The Images list displays, you will need to the Public images filter button on the top right of the list. In the list of Public images, find the image named “TPAC rstudio.xxx yyyyy” where xxx and yyyyy are mere version numbers. On the right in this image table, click the image’s Launch action button.
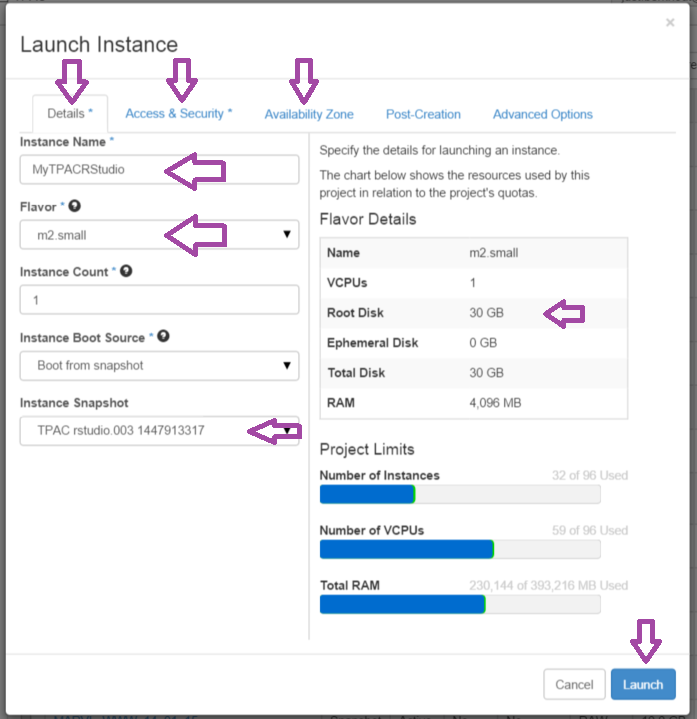
The Launch Instance dialog displays.
On the Details tab of the dialog, enter the instance Name, and select a Flavor with a minimum of 10GB root disk (Flavor is Nectar for size of your VM). The Image name "TPAC rstudio.xxx ..." is already selected.
On the Access & Security tab, select your key pair, and select one or more security groups to apply to your VM. To complete the instructions in this document, you will need a security group that allows SSH
If you have any specific reason to run your VM in a specific availability zone, you can select it on the Availability Zone tab. Alternatively you can let NeCTAR decide where best to host your VM by leaving the selector on “Any availability zone”.
You don’t have to change anything on the “post-Creation and Advanced Options tabs.
Click Launch. Launching should complete in minutes. When your instance has successfully launched, the Dashboard will show your the IP Address of your VM.
Connecting to your RStudio remote desktop using X2Go
The RStudio you launched using the TPAC Rstudio image has the X2Go remote desktop service and the MATE GUI provider preinstalled. So your VM is ready for for it.
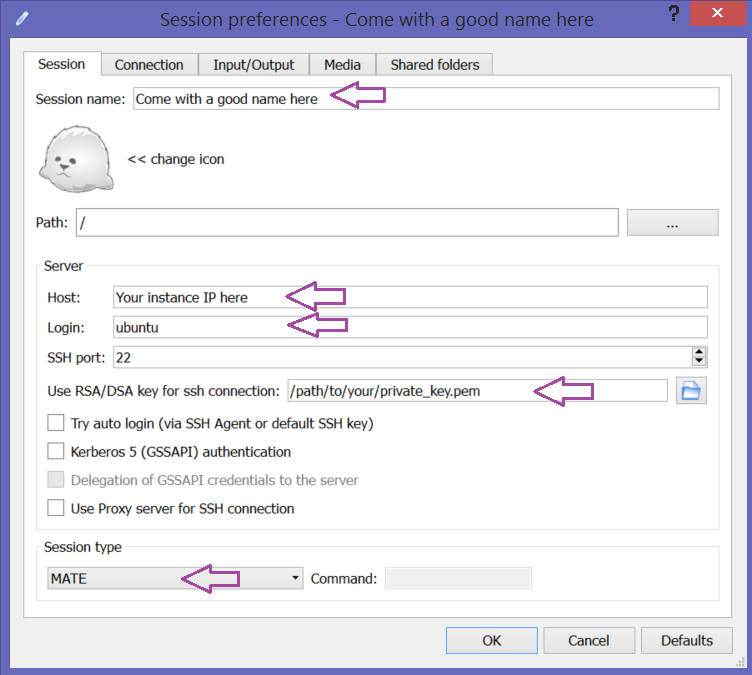
Your local computer will need the X2Go client software installed. If you don’t already have the X2Go Client on your machine, you can find the instructions for you Operating System under X2Go Client Installation in Getting Started with TPAC remote desktop.
When you have the X2Go client installed you will need to create a “Session”. At its most basic you will need the IP Address of the remote desktop RStudio VM you’ve launched, the user name for your VM (TPAC RStudio image provides you with the ubuntu username by default) and your private key. Detailed instructions can be found under Use X2Go Client in document TPAC Remote Desktop X2Go, but the screenshot below should give you the basic idea.
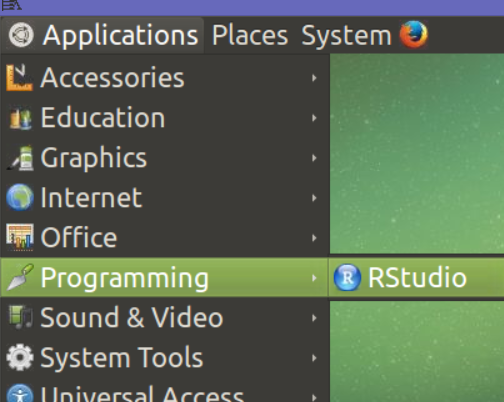
When you're successfully connected, you can find the RStudio in the menu (top left) under Applications | Programming
What’s on my RStudio remote desktop instance
In the building process for the TPAC RStudio image, the software that will be installed will be the latest as provided by NeCTAR, Linux package managers or software providers.
NeCTAR Ubuntu LTS release
Mate desktop
X2Go server
RStudio
Additional R packages rgdal, rgeos, ncdf4, raster, abind, ade4, adehabitatHR, adehabitatLT, adehabitatMA, akima, animation, bit, bitops, brew, caTools, changepoint, CircStats, coda, colorspace, crawl, deldir, devtools, dichromat, digest, dismo, diveMove, evaluate, ff, FNN, foreach, formatR, gdalUtils, GeoLight, geometry, geosphere, ggplot2, gstat, gtable, highr, htmltools, httpuv, httr, intervals, iterators, jsonlite, knitr, labeling, magic, mapdata, maps, maptools, markdown, memoise, mime, misc3d, munsell, mvtnorm, ncdf, ncdf4, plyr, polyclip, proto, quantreg, R6, raster, RColorBrewer, Rcpp, RCurl, reshape2, rgdal, rgeos, RJSONIO, R.methodsS3, RNetCDF, R.oo, roxygen2, rstudioapi, R.utils, scales, shiny, sp, spacetime, SparseM, stringr, tensor, testthat, trip, whisker, XML, xtable, xts, yaml, zoo, rgl
What next
If you want to use your VM as collaboration space, you will need to do some user management. For this you can refer to “Add Accounts on The X2Go Server” in TPAC Remote Desktop X2go documentation. On top of that, your collaborators will need to install their own X2Go client, refer above.
Your TPAC image based RStudio remote desktop instance is also an RStudio Server. With some user management, and some NeCTAR security settings, you can get or give access to your RStudio VM using a web-browser. For more info on this you can view skip to the bottom of Step 2 of the instructions at TPAC RStudio Server
Additionally your VM is also a Shiny Server for interactive R-backed web applications. Learn more at the Shiny Server websiteshiny. You will need to some allow connections to tcp port 3838 in the Nectar security settings to allow access to your Shiny Server on your VM.
You can create a Shared Data Folder on the Remote Server. Head over to here to find out how.
Contact
If you have trouble with TPAC R-Studio image, please contact TPAC help desk via helpdesk@tpac.org.au, or any help desks from your local Eresearch service providers.