- Introduction
- X2Go Remote Desktop
- TPAC Remote Desktop Image
- TPAC Remote Desktop (X2Go) User Guide
- Security
- Remote Desktop Server Installation
- Contact
Introduction
A remote desktop is a service that allows a user to access and view an operating system’s desktop session that is running on another computer in another geographical location. The access occurs via the Internet or through local area network and enables users to interact with at system as if they were physically at their own computer.
In a remote desktop setup, the local computer receives a copy of the desktop image from the remote computer updated regularly or when a change is detected. The local computer’s keyboard and mouse inputs are transferred to the remote computer, where the remote desktop software implements the instructions accordingly.
Protocols for remote desktop include Remote Desktop Protocol(RDP), virtual network computing (VNC) and NX technology.
Virtual machines running in the Nectar Cloud can be accessed via a remote desktop service, which allows users to access the virtual machines through a desktop GUI rather than a traditional command line console.
Accessing virtual machine through a remote desktop provides many benefits over traditional local computer access:
Allowing users to access a ‘workplace’ computer from any location
More computing power than is available in user’s local computer
Easy to share data and to collaborate among users
More reliable computer system that offers 24 hours access
More storage options and larger disk size
Better technical supports as the virtual machine can be easily accessed by a system administrator
Enables running GUI applications (e.g.Matlab) in the Cloud
Multiple users can access the remote computer at the same time
X2Go Remote Desktop
x2go is a free remote desktop tool using NX technology for low latency access to graphical applications running on remote computers (such as NeCTAR virtual machines). It's much more elegant and easier to use than VNC over ssh, or freeNX or the like. Features include:
Simple installation
Client supports windows, mac and linux
Traffic is securely tunneled over SSH
Very fast window redraw, low latency feedback on user input.
Dynamic window re-scaling (you can drag the x2go window to resize it, and the remote windows resize too)
Supports multiple desktop environments (MAte, GNOME, KDE, etc.)
Copy and paste passthrough
Sound, printing and remote file sharing (all untested at this stage)
For more information about X2Go, please refer to its offical websitex2go
X20Go Client
The X2Go Client is the client application that connects to a remote server and a display a graphical desktop on a local machine. The client requires X11 Server installed on the local machine. On windows, the X11 Server has included in the installation. On Linux, the client uses the local Xorg Server. On Mac, XQuartz X11 server is required in order for the client to function.
X2Go Server
The X2Go server is the server application that runs on the remote machine. It starts the application desktop sessions and transfers the desktop to the client, which is the X20Go client.
For more information about X2G0, please visit X2Go official website
TPAC Remote Desktop Image
You can install X2Go server on any supported Linux distributions on the virtual machines in NecTAR Cloud and access that machines from anywhere over a network. Currently, TPAC provides a Image in NecTAR Cloud with X2Go Server pre-installed. Users can utilize this image to launch a Virtual Machine for their applications require remote desktop. The image also contains a GUI desktop application (Mate), that provides the GUI environment for users to images applications in Ubuntu. The below lists what software packages have been pre-installed:
Ubuntu 14.04 (operating system)
X2Go Server (remote desktop server)
Mate 1.8.1 (GUI desktop)
Python 2.7.6 and Python 3.4
openjdk-7
nano
gcc 4.8, g++ 4.8
gimp
TPAC Remote Desktop (X2Go) User Guide
TPAC recommends X2Go and MATE desktop environment for providing remote desktop capability to NeCTAR virtual machines. This guide is about how to install and use three components to make an X2Go remote desktop run in your virtual machine. The GUI provider (MATE) (on your virtual machine), the X2Go server (on your virtual machine), and the X2Go client (on your local machine). If you use one of the TPAC provided X2Go/MATE enabled images as the basis of your VM, then you only need to ensure the you have an X2Go Client installed; the X2Go Server and the MATE GUI provider are already installed for you.
General requirements:
A supported Linux operating system on the remote host
Windows, OSX or Linux on the client side.
X2Go server installed on the remote host, no further configuration is required. You can use TPAC rebuild image to launch a virtual machine as it has pre-installed the X2Go Server and MATE Desktop.
An account with ssh access on the remote host (either via certificates or password)
X2Go client installed and configured to talk to the remote host
What you need
Aside from computer and network access, you will need to be an Australian Access Federation eligible researcher to access the NeCTAR cloud. You will also have to use key-pair security for your virtual machine authentication. Upon first NeCTAR cloud use, AAF eligible researchers are issued with a limited trial allocation. If you need more resources, such as CPU, data storage space, or you need it for longer than your trial allocation, then you can request a NeCTAR allocation.
X2Go Client Installation
X2Go Client on Windows
Install X2Go Client on Windows is straightforward. You can go to this link to download the windows executable file. After the download, double click the executable file and follow the instructions on the screen. Once you have finished the installation, you can double click the X2Go icon to start the client.
X2Go Client on OS X
You need to install OS X X11 server first before you can use the X2go Is Client. The X2Go OS X client use OS X X11 server and you can obtain it(.dmg) from xquartz.
To install x2Go Client on OS X, please go to this link to download the installation packages (.dmg) matching your IOS version.
The below instruction shows how to install a .dmf file:
double click the .dmf file to make its content available
drag the application from the .dmf window into /Applications to install
wait for the copy process to finish
eject the .dmf file
delete the .dmf file
X2Go Client on Linux
Ubuntu/Debian apt-get install x2goclient
Fedora yum install x2goclient
Redhat Please go to this link for detailed instruction.
Use X2Go Client
The below instruction shows how to set up X2Go Client to connect to a remote virtual machine with X2Go client preinstalled in windows environment. For instructions in Linux and OS X, please refer to X2Go official website.
- Double click X2Go Client icon on the desktop, or you can search it through windows search function. You should see the below screenshot:
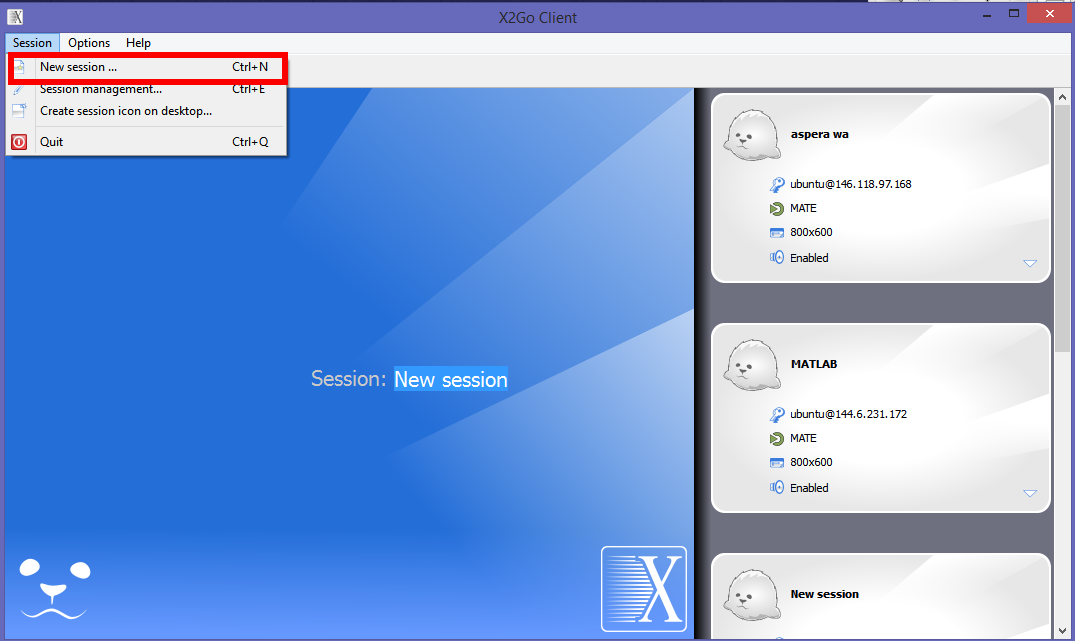
- You need to create a session to connect to the remote virtual machine desktop. Click ‘session’ menu and then click ‘New session’ menu time. You should see the below screenshot:
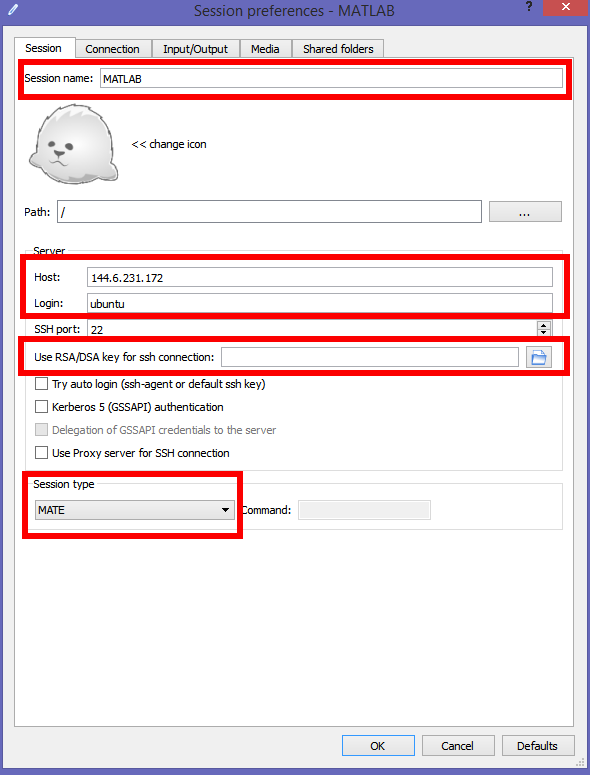
- You can provide a Session name, the IP of the virtual machine in Host field and the user account in Login field. In Use RSA/DSA key for ssh connection field, put the private key matching the public key used when launching the virtual machine in NecTAR Cloud. In the Session type list, select MATE as your desktop. You can also select other desktop type if it is installed on your virtual machine. Then, click OK and you should see something like the below screenshot:
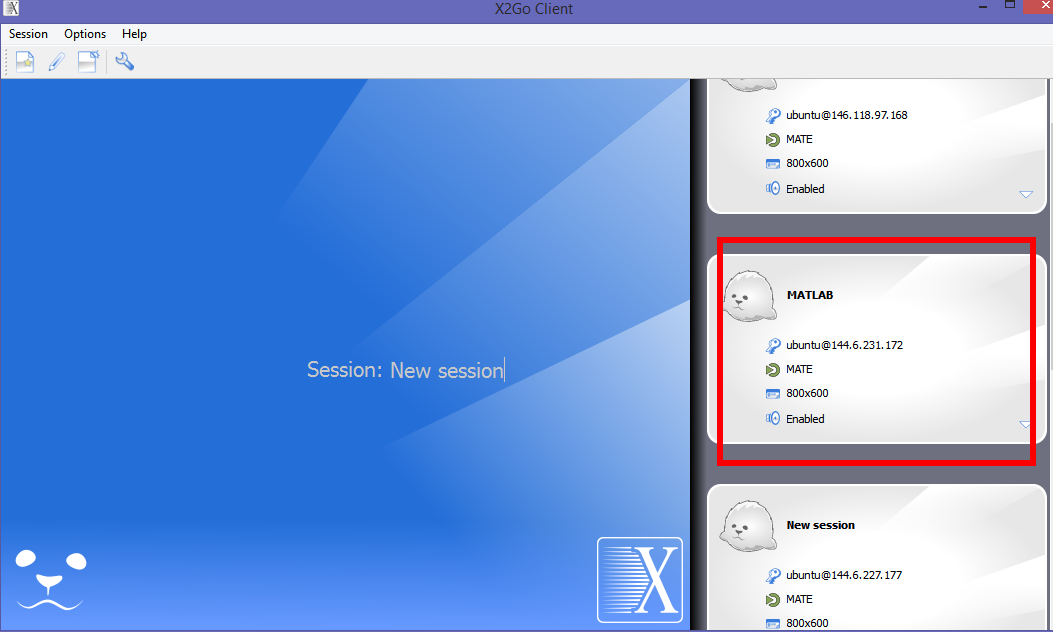
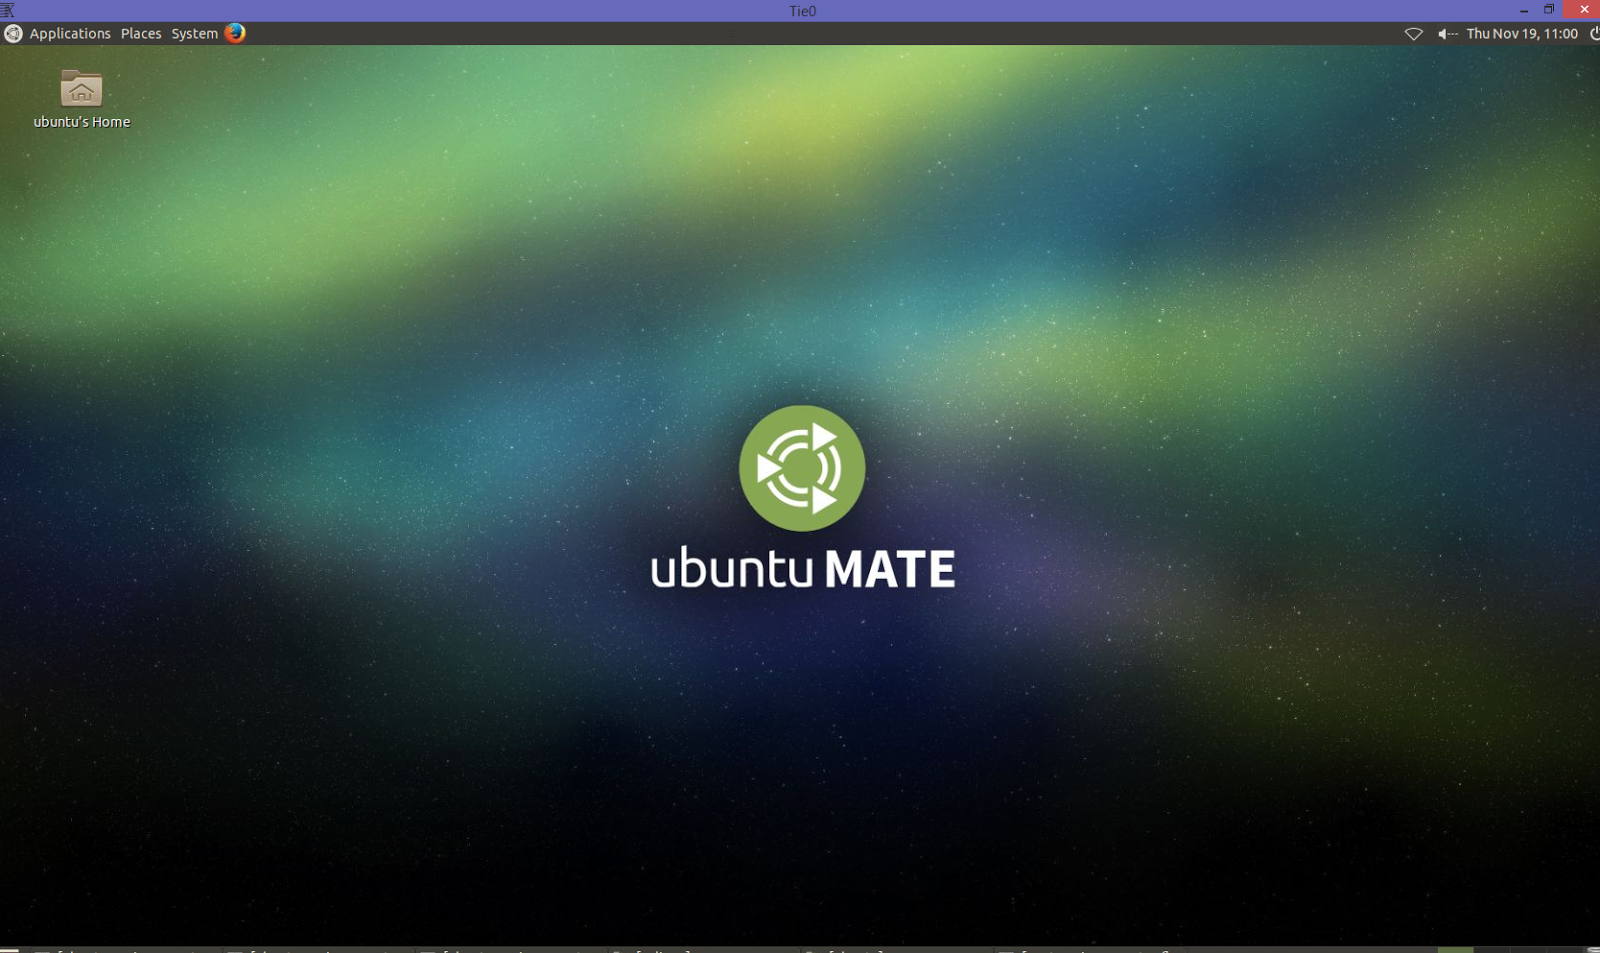
- Double click that new icon on the right hand side of X2Go window, you should see the mate desktop
Launch a Virtual Machine With X2Go
You can follow the below instruction to launch a virtual machine in NeCTAR cloud using the TPAC pre-build X2Go Image. For details how to launch a virtual machine in NeCTAR cloud, you can refer to this link.
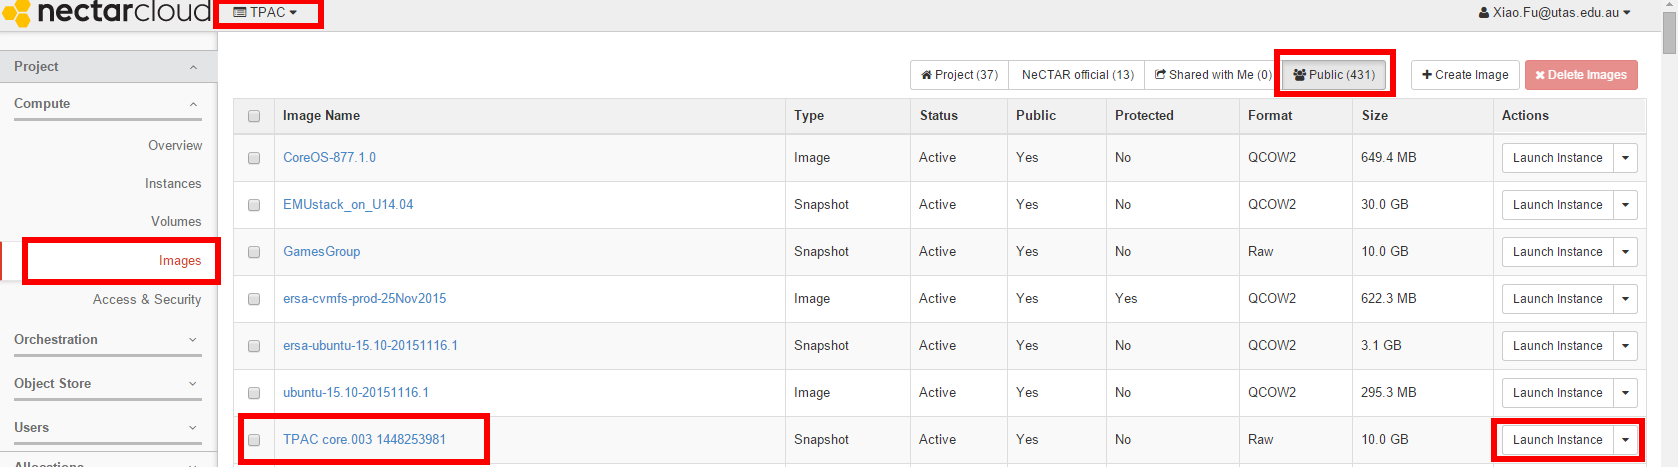
Go to NeCTAR Dashboard
Select a project
Click ‘Images’ and in the image list find image ‘TPAC core.003 1448253981’
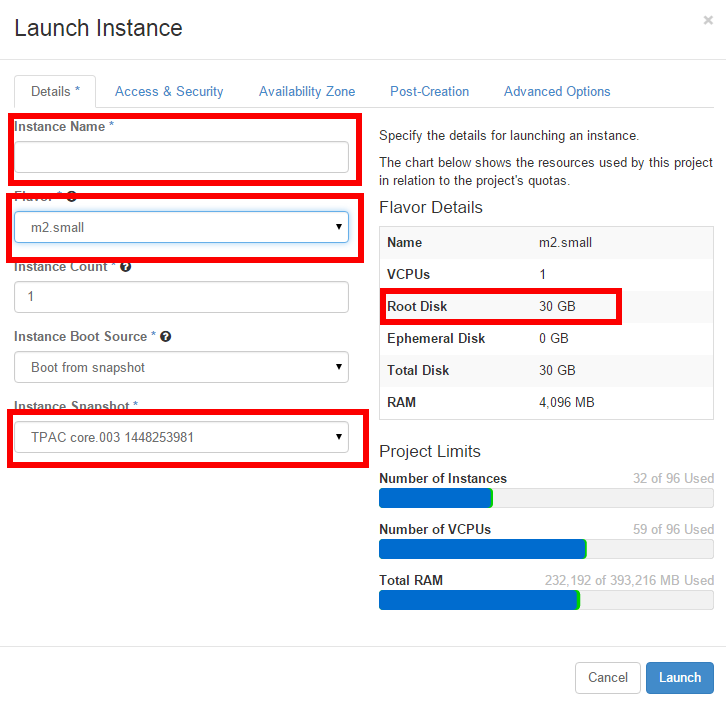
- Click associated ‘Launch’ button and follow the instructions on the pop up window. Provide some information for the virtual machine, such as name and flavour. The desktop application such as Mate requires larger root disk size, so it is preferred to use flavour m2.small, m2.medium, m2.large and m2.xlarge as these flavours have 30G root disk.
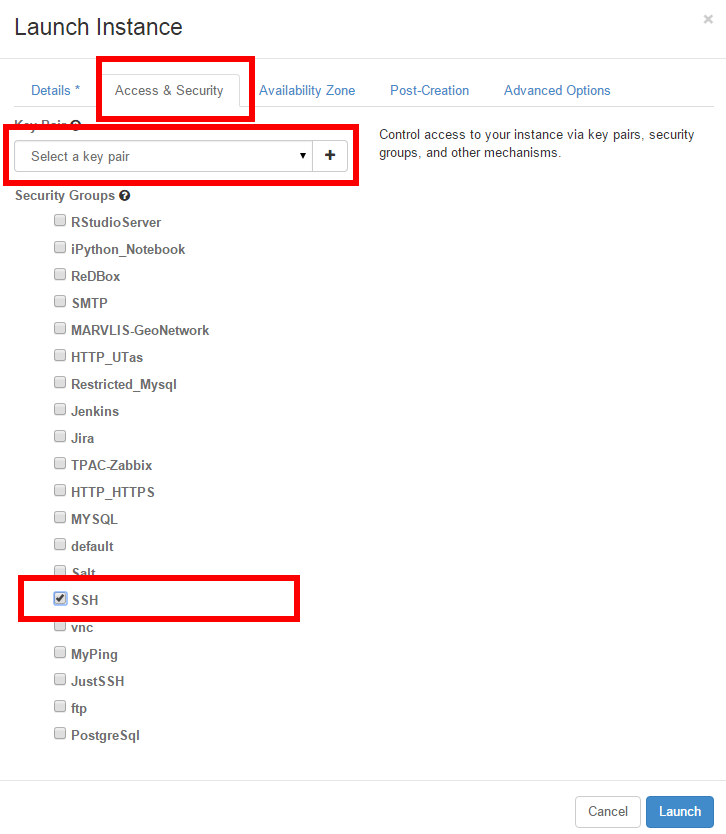
- Click 'Access & Security' tab, select the key pair for authentication and the security group. For how to generate a key pair in NecTAR Dashboard, please refer to this link. You also need to open port 22, as X2Go uses it for communication between X2Go Server and Client. So please ensure ticking the security group with ssh 22 open.
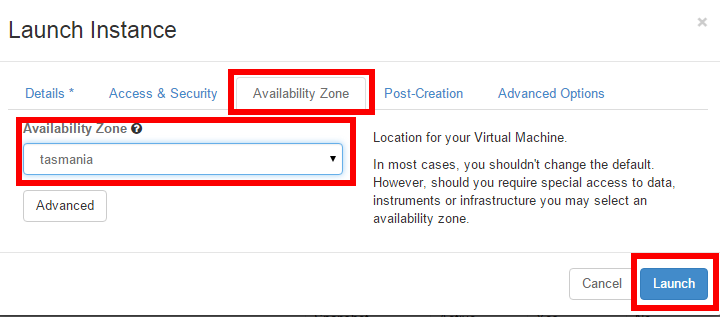
- Click 'Availability Zone 'tab. Select the required location of virtualm achine. Click ‘Launch’ button. It might take various minutes to launch a virtual machine up to the chosen availability zone.
Now, you should have a working X2Go server and you can use X2Go client (refer to above document) to connect to it. The X2Go has a default user account available which is same as the image default account. For Ubuntu image, the default user is ubuntu. You can find more default users for other operating systems at this link.
Introduction to MATE Desktop
The TPAC pre-build X2Go image has Mate Desktop installed as its default desktop application. The MATE Desktop Environment is derived from GNOME 2 and it provides an attractive and user-friendly interface for Linux. The below note explains how to use the MATE interface and how to start applications, and how to explore the file system.
For more information about Mate Desktop, please refer to Mate Desktop official website.
Elements of the MATE Desktop
The MATE Desktop contains a link to your home directory file browser and the Edge Panel on the right top corner. The Edge Panel has a calendar, a power off button and a network monitor. On the left top corner is the Applications menu, where you can start installed applications. See the below screenshot:
Launching Applications with the Application Menu
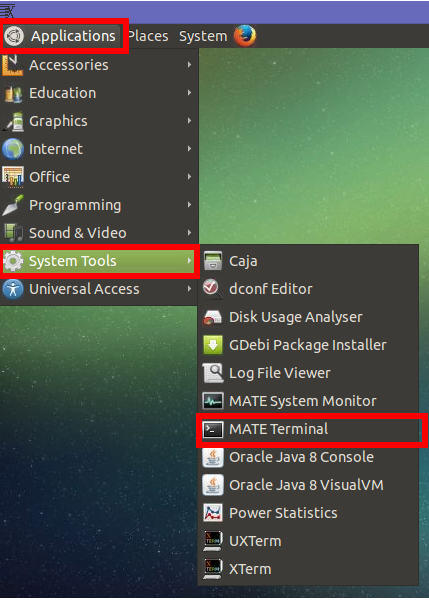
The Applications menu is where you find and launch applications. Move your mouse pointer over the Application Menu and click to open the menu. All applications are grouped by a name such as Accessories and System Tools. To start an application such as ‘MATE Terminal’, move mouse pointer over the group name, in this case it is ‘System Tools’ and this expands the menu to contain a sub menu. From the sub menu, move mouse pointer over the ‘MATE Terminal’ and click. It is possible to have have more level of sub-menus and the launching process is the same.
Managing File System
The MATE Desktop contains a link to your home directory and you can simply double click that to open the file browser. You can also find the file browser from the ‘Application menu’ under the ‘System Tools’ group. The menu item name is ‘Caja’.
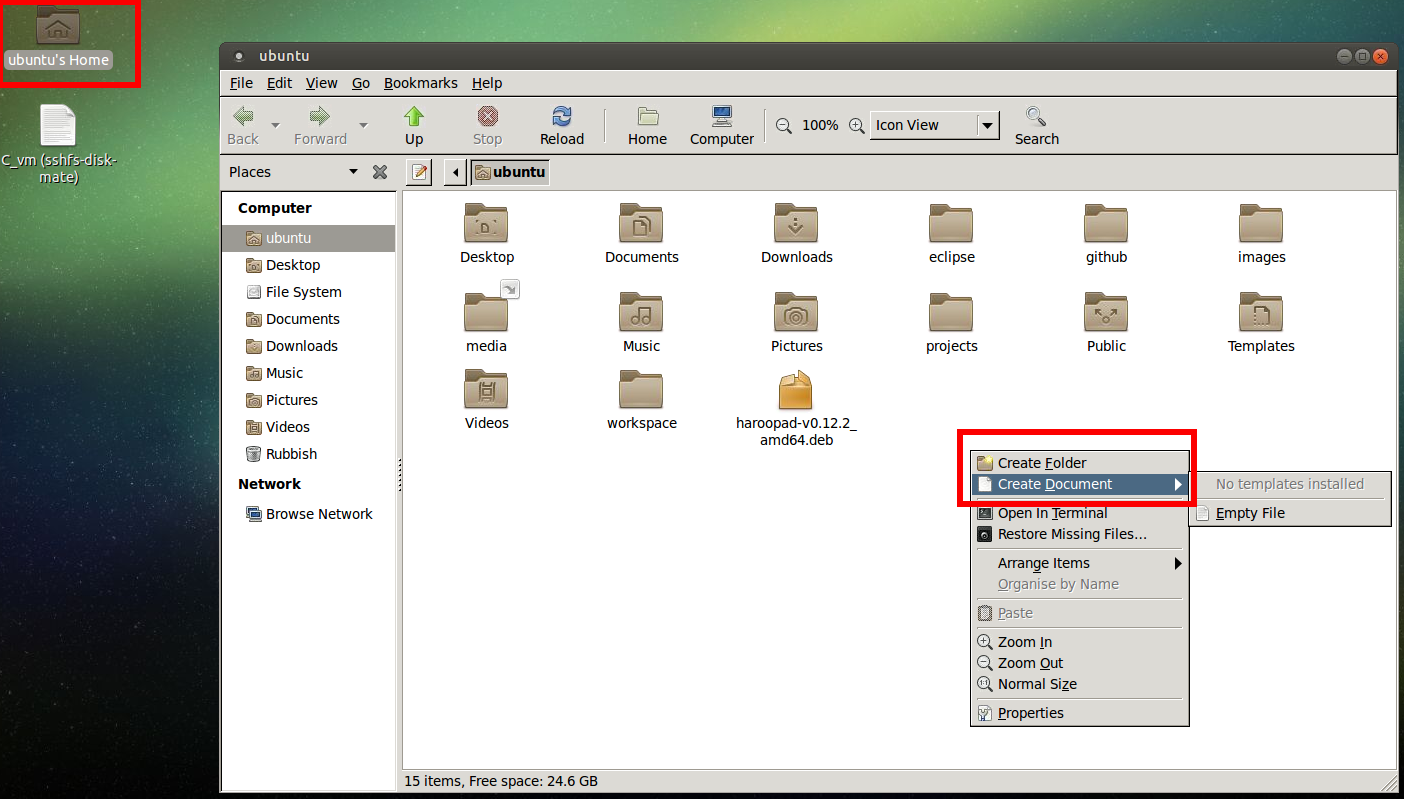
The file browser shown above displays all files and folders under the account ubuntu’s home directory. If you right click your mouse and this should bring the context menu, see above screenshot. You can click the ‘Empty File’ menu item under the ‘Create Document’ to create a new empty file or click ‘Create Folder’ to create a new folder. On the left hand side has a list of folders under your home folder for your convenience. You can also click the left arrow button on the toolbar to navigate to parent folder.
Change System settings
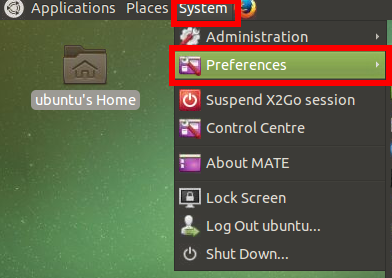
Besides the Applications menu, there is a System menu, which you can use to perform system related functions such as change the Fonts and Desktop appearances. All these functions are under Preferences menu.
Add Accounts on The X2Go Server
The MATE Desktop session is associated with the system user account. By default in Ubuntu, this user account is ubuntu. If you want to add more accounts to access the X2Go Desktop, you can add more system user accounts and X2Go will automatically link the accounts to the X2Go Desktop session. The below note shows how to add a user account to Ubuntu. For other operating systems, please refer to the relevant documents.
Open a ‘Mate Terminal’ and type
sudo adduser testThe console prompts a series of questions. The procedure will be:
Assign and confirm a password
Enter any additional information about the new user account
Type ‘Y’ to confirm and create the new user account
You can also add user to sudo group to give the user account sudo permission. Type
sudo usermod -aG sudo username
Note, by default, user password authentication is disabled and you need to enable it first before you can use password to login. Please edit the /etc/ssh/sshd_config file and set keyword PasswordAuthentication to yes to enable it.
Now you should have a new user created. To use this account to login to X2Go session, simply create a new session in the X2Go Client and add the new username in the Login field. Once you have created the session, you can double click the session and type in the password. You should see the MATE desktop after that.
Create a Shared Data Folder on the Remote Server
X2Go provides a feature to allow folder on a local computer such as a Laptop to be shared with the X2Go server. That means you can easily share your data and files between the X2Go Client and Server. The below note demonstrates how to enable this feature using X2Go Windows Client.
Double click the the X2Go icon on the Windows Desktop
This brings up the X2Go Client window. Click the ‘Session’ menu and click the ‘Session management‘. This should bring you the screenshot like below:
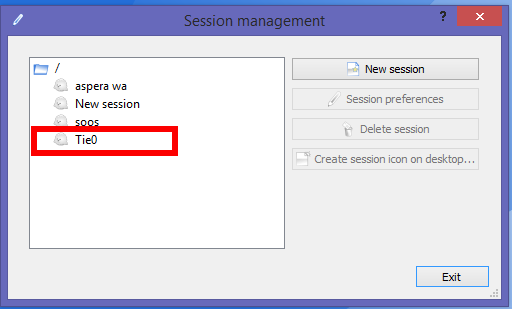
- Find the session you want to share folder with the X2Go Server and double click the session name. On the pop out window, click ‘Shared folders’ tab and this should bring you the below screenshot. Please refer to the above document to find out how to create a new session
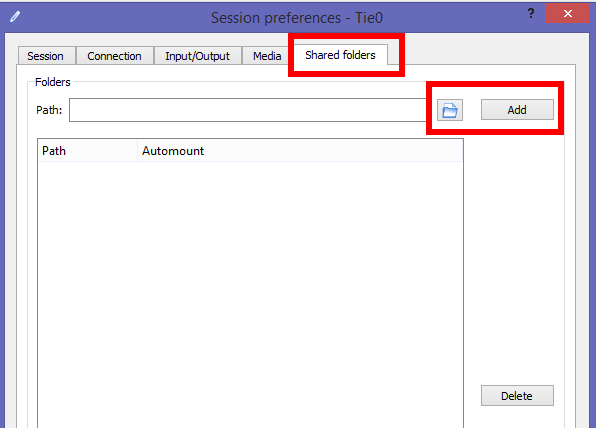
Click the ‘file browser’ button and in the pop up window, select the local folder you want to share and click ‘Select Folder’ button.
Click the ‘Add button’ and the folder name should be appeared in the list. Then tick Automount checkbox. See below screenshot:
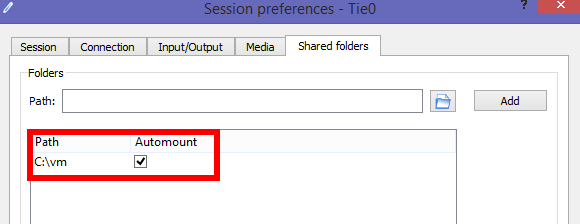
Click ‘Ok’ button and client setup has been finished
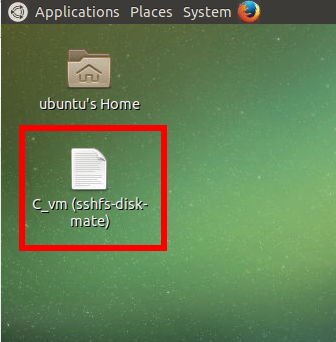
You can double click the session and open a new connection to X2Go Server. On the MATE Desktop, you should see a icon below the ‘ubuntu’Home’ icon. Double click the icon and it should open a file browser window.
- Now, if you copy files to your shared local folder, these files will be appeared on your X2Go Server as well and vice versa.
Note, folder on your local computer should has read/write permission for X2Go Client. Otherwise, the shared local fold cannot be accessed by X2Go Server.
Upload and Download Files
Besides the shared local folder function, you can also use a SFTP client to upload and download files from the X2Go Server. The below note shows you how to use a SFTP client in Windows environment.
Go to WinSCP official websiteto download the installer
Double click the downloaded executable file and follow the instructions to install the software
After launching the software, you should see the below login window
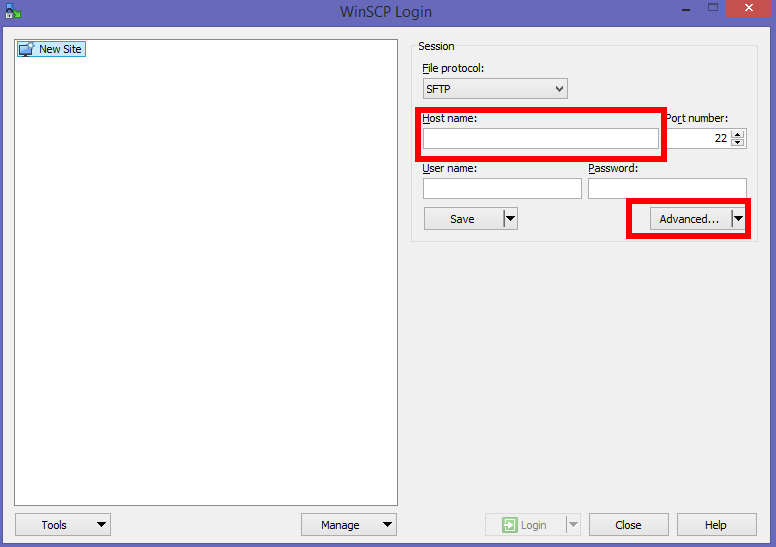
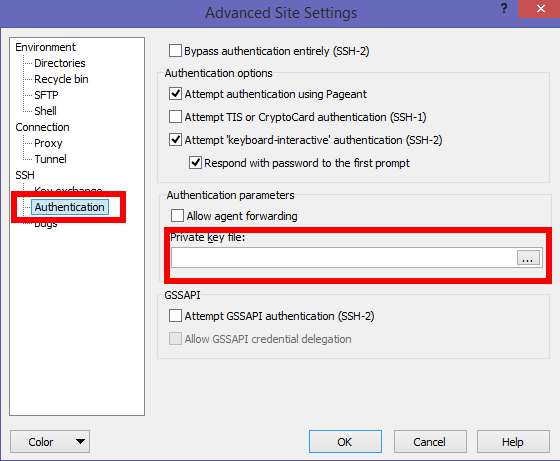
- On the login window, you can type in the IP address of the Virtual Machine (X2Go Server) in the ‘Host name’ field and account name in the ‘User name’ field. You can type in the password if the user account uses password authentication or click ‘Advanced’ button to load a private key for authentication. See the below screenshot. After you click the ‘Authentication’ under the SSH section, click the file browser button located under ‘Private key file’ and then you can select the private key and click ‘Open’ button. After that, click ‘Ok’ button to go back to the login window.
You can then click the Login button to connect to the virtual machine (X2Go Server). You can also click the save button to save the login session for reuse.
After the connection is successfully established. You should see the below window. On this window, you can drag and drop files to be copied from the Client to the Server or vice versa. You can also browse folder structure and select which folder to be the current folder.

Security
By default, there is only one default user 'ubuntu' and it uses key based authentication. If you want to create more users to use the virtual machine, please use key based authentication rather than password based authentication. For a quick security check list, please refer to here.
Remote Desktop Server Installation
If you would like to install an X2Go/MATE remote desktop on your existing instance, then you can find some instructions below. It assumes that you uses Ubuntu as the operating system in your existing virtual machine and TPAC has only tested it on Ubuntu 14.04.
Install the Mate GUI
Use your terminal application (e.g. Putty) to ssh to the remote host (i.e. your virtual machine).
Run the following commands:
sudo apt-add-repository ppa:ubuntu-mate-dev/ppa
sudo apt-add-repository ppa:ubuntu-mate-dev/trusty-mate
sudo apt-get update
sudo apt-get upgrade
sudo apt-get install --no-install-recommends ubuntu-mate-core ubuntu-mate-desktop
sudo reboot
Install x2Go on the remote host
Use your terminal application (e.g. Putty) to ssh to the remote host (i.e. your virtual machine).
Run the following commands:
sudo apt-get update
sudo apt-get install software-properties-common
sudo add-apt-repository ppa:x2go/stable
sudo apt-get update
sudo apt-get install x2goserver x2goserver-xsession
For more information, please visit X2Go official website
Contact
If you have problems with TPAC X2Go image, please contact TPAC help desk via helpdesk@tpac.org.au, or any help desks from your local Eresearch service providers.
Was this article helpful?
That’s Great!
Thank you for your feedback
Sorry! We couldn't be helpful
Thank you for your feedback
Feedback sent
We appreciate your effort and will try to fix the article