Nimrod toolkit for high throughput computing in the cloud
Introduction
The Nimrod tool family facilitates high-throughput science by allowing researchers to use computational models to explore complex design spaces. Models can be executed across changing input parameters. Different members of the tool family support complete and partial parameter sweeps, numerical search by non-linear optimisation, and even workflows. Further, Nimrod allows computational researchers to use a mixture of university-level infrastructure and commercial clouds.
There are several ‘flavours’ of Nimrod. Which Nimrod you choose to use, either singly, or in combination, will depend on the kind of experiment you want to run.
Nimrod/G
Nimrod/G can directly execute large-scale distributed parameter sweep and Monte-Carlo computational experiments. It provides a simple means to dramatically scale-up your computational experiments. Each experiment can run over an aggregated ad-hoc computational grid/pool/cloud; start from your desktop, local server or cluster; add grid resources (e.g. clusters and Condor pools); overflow to pay-as-go cloud services and control your budget with Nimrod/G's economic scheduling capabilities.
Nimrod/K
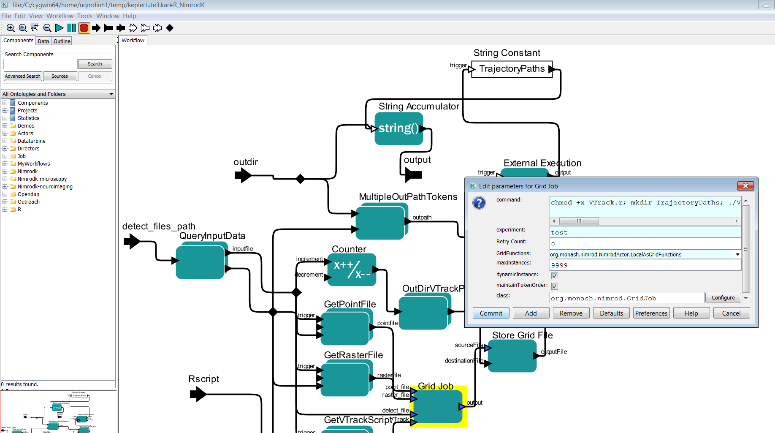
Nimrod/K is built on Kepler using Kepler’s runtime engine Ptolemy. It extends Kepler by adding parameter tools and grid/cloud services and by providing dynamic parallelism in workflows.
It uses a dataflow execution model that was originally developed for highly parallel dataflow computers in the 1980’s, and this provides an extremely rich execution mechanism. It leverages a number of the techniques developed in the earlier Nimrod tools for distributing tasks to the Grid.
Nimrod/O
Provides an optimisation framework for optimising a target output value of an application. It allows a user to run an arbitrary computational model as the core of a non-linear optimization process. Nimrod/O allows a user to specify the domain and type of parameters to the model, and also a specification of which output variable is to be minimized or maximized. Accordingly, a user can formulate a question like: what parameter settings will minimize the model output? Nimrod/O currently employs a number of built-in optimization algorithms:
-
BFGS
-
Simplex
-
Divide and Conquer
-
Simulated Annealing.
Jobs can be executed on a variety of platforms, which when combined with Nimrod/G includes distributed clusters and Computational Grid resources.
Target Audience
The following research activities can benefit from using Nimrod.
-
You need to run your computational model many times and average the results because the model is stochastic. These types of Monte Carlo simulations are greatly facilitated by Nimrod/G. It will generate multiple jobs, furnishing them with different random number seeds and execute them concurrently on the grid.
-
You wish to explore the effect of varying the inputs to your model. Inputs may be in the form of command line parameters or of values in some input file; in Nimrod these are both called parameters. Either way Nimrod/G will let you specify values for each parameter, will generate the jobs for all possible combinations of these values and execute the jobs on the Grid.
-
You wish to explore the effect of input parameters but for certain combinations are not allowed. There are several possible ways to do this. If the disallowed combinations give jobs that quickly fail then you may schedule all possible combinations and let those bad jobs fail. However, if those jobs will use substantial resources then it would be better to filter them out first. This can be done in Nimrod/G by processing the run file. Alternatively Nimrod/O may be used in sweep mode as it provides the functionality to add formulas for constraints on the parameters.
-
You are running several different experiments. They may produce some jobs with the same inputs and you don't want to waste resources duplicating these jobs. Nimrod/O can be invoked with a persistent cache shared by the experiments, so avoiding duplications.
-
You wish to find the combination of input parameters that produce an optimal output. Nimrod/O allows you to specify the inputs that vary, any constraints on those inputs, and the output to be maximized or minimized. It offers a selection of search methods for finding the optimum. Multiple searches, perhaps using different optimization methods, may be run in parallel.
-
You want to find the inputs that generate the best output. Nimrod/O allows optimization where human input may be used to assess the quality of an output. This is especially useful for complex outputs such as images or animations.
-
There are several aspects of your model output that you wish to optimize. Nimrod/O is currently being modified to facilitate such multi-objective optimization.
-
You wish to perform multiple optimizations on the output of your model, one optimization for each combination of some parameter settings. This can be done using Nimrod/G to sweep over the setting and having it call Nimrod/O to do each optimization.
-
You wish to run your model in reverse. In other words you want to find the input values that will produce a given output. Nimrod/O is commonly used for this task. You need to have a way of measuring the discrepancy between your output and the desired one. Then run an optimization to minimize this discrepancy.
-
You have developed your own optimization method. You wish to use the method, taking advantage of the distributed execution of jobs and the caching supplied in Nimrod/O.
-
Different parts of your model need to run on different machines because of data files perhaps or licence requirements. Nimrod/G can schedule such workflow experiments and perform the appropriate communication between the parts. Where possible a downstream component may start processing its input file before an upstream component has completed that file.
-
Some of your model executions require prior execution of other models. Nimrod/G can handle such dependencies.
How to install
Nimrod allows computational researchers to use a mixture of university-level infrastructure and commercial clouds.
Users can trial their Nimrod experiments using the Nimrod Portal resource pool. Users are encouraged to bring their own compute resources (e.g. cluster, cloud allocation) to use with Nimrod. Please contact Minh Dinh and Hoang Anh Nguyen regarding adding new remote compute resources to their experiments.
Users can still opt to install Nimrod Toolkit on their local system, provided that system meets the software and operating system requirements outlined in the Resource Requirements section. If the user chooses to do that, here are step by step procedures for installing individual Nimrod Toolkit.
Installing Nimrod/G
Users must executed the following steps to install Nimrod/G:
-
Download Nimrod/G source distribution
-
Setup Nimrod/G environment
-
Create experiments directory
-
Install Nimrod/G
-
Setup Nimrod/G database
Download Nimrod/G Distribution
Download from following link:
Download the Nimrod/G source archive to your home directory, which should create a file:
- $HOME/nimrodg-[version].tar.gz
Setup Nimrod/G Environment
We recommend editing your shell rc scripts (.profile or .bashrc or .cshrc, etc), or adding an /etc/profile.d/nimrod.sh script for system-wide installs. For sh based shells you will need something like (paths should be altered as appropriate for your install/system):
export NIMROD_INSTALL=$HOME/bin/nimrodg export NIMROD_DATABASE=pgsql-pool
export PSQL_LOCATION=/usr/bin # in this case /usr/bin/psql should be a valid path
export PYTHONPATH=${NIMROD_INSTALL}/share/nimrod:${PYTHONPATH}\ export PATH=${NIMROD_INSTALL}/bin:${PATH}
Create Experiments Directory
Nimrod/G keeps all the experiments it runs in a subdirectory of user's home directory $HOME/.nimrod/experiments. Create that directory by executing the following command:
$ mkdir -p $HOME/.nimrod/experiments
Install Nimrod/G
- Decompress Nimrod/G source archive. Let’s assume we downloaded a source archive for Nimrod/G version 4.0.2:
$ cd $HOME
$ tar -zxvf nimrodg-4.0.2.tar.gz
- Configure and install Nimrod/G
$ cd nimrodg-4.0.2
$ ./configure --prefix=$NIMROD_INSTALL
$ make; make install
Setup Nimrod/G Database
Nimrod/G runs on top of PostgreSQL relational database. Before anything can be done, user must create a database which will be used by Nimrod/G. Each Nimrod/G user requires their own PostgreSQL database.
- As a PostgreSQL admin user create a PostgreSQL user. Must ensure > that the user can create databases (prompted during the process):
$ createuser <username>
- As the user, create a database
$ createdb
- As the user, populate that database with Nimrod/G database schema
$ nimrod dbcreate
Platform and Version Specific Notes
- Python 2.6
To configure the Nimrod build files against Python2.6 (confirmed on Ubuntu 10.04) it seems to be necessary to set LDFLAGS=-lm.
- Ubuntu 10.04
To configure the Nimrod build files against the included Python2.6 on Ubuntu 10.04 it seems to be necessary to set LDFLAGS=-lm.
- RHEL6
Using the OS default Python (2.6) to install Nimrod may result in the make install step failing to install 3rd party modules that are packaged with Nimrod, with an error message like:
You are attempting to install a package to a directory that is not on PYTHONPATH and which Python does not read ".pth" files from.
This can be remedied by ensuring $NIMROD_INSTALL/share/nimrod is in your $PYTHONPATH environment variable.
Installing Nimrod/K
Users must executed the following steps to install Nimrod/K:
-
Download Nimrod/K distribution
-
Install Nimrod/K
Download Nimrod/K Distribution
This can be done by following Nimrod/K link at:
Download the Nimrod/K distribution to your home directory which should create a file:
- $HOME/nimrodk-[version].jar
Steps to install Nimrod/K
For the purposes of this installation guide, we will assume that the version we are working on is 2.0.0. Nimrod/K major version number will always follow Kepler's major version number so version 2.0.0 means that this version of Nimrod/K will work with latest version of Kepler with major version number
Nimrod/K jar file has following install options:
options:
--help|-h -- print this message
--acceptlicense|-a -- accept Nimrod/K license without prompting. If omitted user will be
given a choice (declining will stop the installation).
--prefix=<path> -- set a location of where all Nimrod/K modules are installed (eg. –
prefix=/usr/local/kepler/2.4/lib). If omitted it will prompt for
the prefix
--keplerversion=<major version number> -- set a kepler version (eg. --keplerversion=2.4).
If ommitted installer will look for it in the following files and
in the order they are listed here:
a) <prefix>/build-area/install-id.txt
b) $KEPLER/build-area/install-id.txt
--version|-v -- prints the Nimrod/K version
Using the above options install Nimrod/K:
java -jar nimrodk-2.0.0.jar [options]
Installing Nimrod/O
A comprehensive manual for Nimrod/O can be downloaded from:
It contains information on how to install Nimrod/O.
How to launch
Running Nimrod/G
In order to run Nimrod/G experiments from command line user needs to do the following:
-
Manage Resources
-
Manage Experiments
Once these are done, experiments can be executed on selected resources.
Resource Management
Adding Resources
Nimrod resources need to be first added to the database before they can be assigned to and used by experiments. Syntax for adding resources is as follows:
$ nimrod resource add <resource_type> <resource_details>
Resource types supported by Nimrod/G include:
- Fork
$ nimrod resource add fork
- PBS - With PBS we need to know the name of a PBS queue and the > hostname of the PBS server. Lets say queue name is workq and > the hostname is localhost
$ nimrod resource add pbs workq@localhost
-
SGE - Same as PBS
-
EC2
Removing Resources
Syntax for removing resources is as follows:
$ nimrod resource remove <resource_type> <resource_details>
Experiment Management
This section will describe how to create, monitor and manage Nimrod/G experiments.
Creating a Plan File
Nimrod/G uses a simple declarative language to describe the experiments. This description is usually written as a simple script file we call a plan file.
There are two sections in this plan file. The first one describes the parameters that your experiment has while the second one describes the task/s that Nimrod/G needs to execute to complete a single instance (or a job) from your experiment. The example below shows a fictional plan file for an experiment investigating wing performance.
parameter aircraft_model files select anyof "A3??.dat" "737-*.dat";
parameter AoA label "Angle of attack" float range from -45 to 45 step 2.5;
parameter winglets text select anyof "none" "fence" "blended" "raked";
parameter airspeed integer range from 50 to 600 step 50;
parameter turbulence label "Normalized Reynolds" float random from 1 to 2;
task main
copy ${aircraft_model} node:.
copy wing_test.zip node:.
node:execute unzip wing_test.zip
node:execute ./run_wing_test.sh ${aircraft_model} ${winglets} ${AoA} \
${airspeed} ${turbulence} >> output.${jobname}
node:execute zip results.${jobname} *
copy node:results.${jobname}.zip .
endtask
This is a somewhat contrived example demonstrating various parameter types but it illustrates the basic functionality of defining parameters for the main task and handling input, execution and output for each of the parameter combinations. The two subsections below explain the 'parameter' and 'task' definitions in the plan file.
Parameters
Parameters define lists of values, constant single values or dynamic values (of various types). A unique combination of parameter values is assigned to each job and each parameter value is bound to a named identifier in the job environment. Nimrod/G experiments usually create a cross-product of all parameters to define the jobs which make up the experiment, we call this a full parameter sweep. The syntax for parameter lines in the plan file is:
parameter <name> <type> [<domain>];
-
name - This is the parameter name which must be unique.
-
type - This part of the parameter tells Nimrod/G what type of parameter this is. There are five types and they are
-
float - floating point number
-
integer - integer (whole) number
-
text - textual values as shown in the example above
-
files - this type allow you to apply glob style file name matching to create a list of files names within the experiment directory which match the given pattern(s), you could use this to parameterize the input files for your computation (like the example above). The files type must be used with the "select anyof" domain.
-
fromfile - this type must refer to a text file that contains a list of values, i.e., the file contains the entire range.
-
-
domain - A parameter domain is optional in some cases but usually required. The following domains are available:
- default- this domain type has only a single value. The syntax for this domain is:
default <value
- range - this domain type has a number of values (points) that are within a specified range. The syntax for the range domain is:
range from <value> to <value> points <value>
range from <value> to <value> step <value>
- random - this domain type has a number of random points generated between specified lower and upper bounds. The syntax for this domain is
random from <value> to <value> [points <value>]
- select anyof - this domain type is usually used for text and files but is also useful for listing fixed numerical values. The syntax for this domain is:
select anyof <value_list> [default <value_list>]
- select oneof - Similar to 'select anyof' except that only one value will be selected for use from this list. If the default value is not specified the first value in the value_list is used. The syntax for this domain is:
select oneof <value_list> [default <value>]
- (some input file) - when using the fromfile type, the domain is an input file that lists the values for the parameter. For example:
parameter x fromfile inputfile.txt
means that inputfile.txt contains a list of single values (one per line) for parameter x.
Tasks
This part of the plan file describes the process of executing a single instance of your experiment. There are a number of operations/commands/directives that can be performed in a task:
-
Copy files to and from compute resources
-
Executing an experiment executable
-
Substituting place-holders in the input files with the real values
-
What to do in case the job fails.
Task operations are typically location dependent. copy and execute directives must specify where the operation should be performed or where the file locations are while copying. This is done by using node: or root: modifiers.
-
node: indicates remote location for the operation. In case of copy operation it indicates that the file resides on remote machine, while in case of execute command it indicates that the executable should be run on the remote server.
-
root: on the other hand indicates that files are on the same machine where Nimrod/G is running, and that execute command that executables are to be run on that same machine, and not on the remote server. Please note that root:execute can only be executed in rootstart and rootfinishtasks.
NOTE: In a typical parameter sweep all program invocations will occur on computational nodes and hence the main task will only use node:execute.
Following is a more thorough description of the task operations:
- copy - this operation is used to copy both input and > output files. Syntax for this operations is as follows:
copy <source> <destination>
For example if you are copying input file to a remote location:
copy root:input.txt node:input.txt
And if you are copying output file back to the server where Nimrod/G is running:
copy node:result.txt root:result.txt
- execute - this operation is used to execute some executable. The syntax for this operatio is:
node:execute <user_command>
user_command is passed to shell (/bin/sh), so it can contain shell constructs (redirection like >, >> etc).
For example if we wanted to execute hostname command and redirect its output into a file called hostname.txt this is what the executeoperation would look like:
node:execute /bin/hostname > hostname.txt
- onerror - this operation indicates how Nimrod/G should behave in case some part of the job fails. It has a scope which is from the point it appears until another onerror statement is found. The syntax for this operation is:
onerror <option>
Valid options are:
-
fail - fail the job. This is the default behaviour and will be > used even if onerror is never specified in the plan file
-
ignore - ignore the error and proceed with the task, ie. move > onto the next line in the plan file and continue executing it.
- substitute - Nimrod/G allows can use skeleton input file for > their experiments. This skeleton input file may contain > placeholders in it that are to be substituted by the actual > parameter values before the execution begins.
This operation is used to replace the parameter placeholders in input file with a job parameter value. The syntax of this operation is:
substitute <source> <destination>
Both source and destination require neither 'node:' nor 'root:' in front of them, i.e. they are just plain filenames. For example, this could be a main task of a plan file:
task main
copy input.skeleton node:.
substitute input.skeleton input.txt
node:execute ./process.sh input.txt > result.txt
copy node:result.txt .
endtask
Creating Experiments
Nimrod/G stores experiments in a specific location in user's home directory:
$HOME/.nimrod/experiments/
Each experiment will have a dedicated subdirectory in that location that matches experiment name. For example:
-
Experiment named demo will be > in $HOME/.nimrod/experiments/demo/
-
Plan file called demo.pln will be in that directory
-
All files related to that experiment will also be location in > that directory
-
In order to create experiment execute the following steps:
-
Create a plan file following instructions from the previous section. > Lets assume we create a plan file called demo.pln
-
Create an experiment directory:
$ mkdir -p $HOME/.nimrod/experiments/demo
-
Place the demo.pln file in that directory
-
Create a file containing all possible parameter combinations:
nimrod generate demo.pln
- Add the experiment to the Nimrod/G database:
nimrod create demo
Assign Resources to Experiments
In section Resource Management we added compute resources to the database. In order for them to be used by an experiment they have to be assigned to that experiment. The syntax for adding resources to experiments is as follows:
nimrod addserver <exp_name> <resource_details> <resource_type>
Resource type and resource details are exact same details that were used when resources were added to database. An example of adding a PBS resource to a demo experiment can be seen below:
nimrod addserver demo workq@localhost pbs
Launching Nimrod/G
With experiments defined and configured Nimrod/G can be launched. The syntax for this command is as follows:
nimrod startexp <exp_name>
For example, to start the experiment called demo run:
nimrod startexp demo
Using Nimrod/K
Nimrod/K extends Kepler by adding parameter tools and grid/cloud services and by providing dynamic parallelism in workflows. As such Nimrod/K functionality is simply used by adding the Nimrod/K director and Nimrod/K actors to Kepler workflows.
Using Nimrod/O
A comprehensive manual for Nimrod/O can be downloaded from:
It contains information on how to launch Nimrod/O.
Resource Requirements
Nimrod Toolkit runs on Unix based platforms only, which includes all flavours of Linux as well as Mac OS X. However, Nimrod Portal component is browser based which allows users of all platforms (including Windows) to access Nimrod and execute computational experiments through any browser.
-
Software Requirements:
-
Python – version 2.5 or higher
-
PostgreSQL – version 8.4 or higher
-
-
Operating System Requirements
-
Linux
-
Mac OS X
-
Nimrod/O can run in standalone mode, in which case Nimrod/G is not required. However in standalone mode Nimrod/O loses the ability to run its jobs on distributed clusters and computational grid resources. For distributing jobs, Nimrod/G 4.0 or higher required
Similar to Nimrod/O, Nimrod/K can run as a standalone application, in which case Nimrod/G is not required. When running in standalone mode Nimrod/K can be installed and used on Windows machines.
Compute Resources
Nimrod allows computational researchers to use a mixture of university-level infrastructure and commercial clouds. For beginners, users can trial their Nimrod experiments using the Nimrod_Portal[^1] resource pool. Users are encouraged to bring their own compute resources (e.g. cluster, cloud allocation) to use with Nimrod. Please contact Minh Dinh and Hoang Anh Nguyen regarding adding new remote compute resources to their experiments.
Nimrod Portal
A web service for using Nimrod/G. Nimrod portal provides a web interface for users to use Nimrod and its resources. Users can create Nimrod/G experiments without installing Nimrod toolkit on their local system. This allows users develop, execute, maintain and share Nimrod parameter sweep experiments.
Installation
Nimrod portal consists of two components: a RESTful Web service and a Web portal. The RESTful service is to expose Nimrod functionality to the Web and the Web portal provides user-friendly interface to the users.
The installation process requires two steps: installation of the Web service and installation of the Web portal. This two-step process takes place in two separate VMs. Nimrod needs to be installed in the Web service VM.
Install Nimrod Web service
The Web service is currently available at: https://bitbucket.org/jhtngu/nimrod.webservice.
This is not a public repository. Please email hoangnguyen177@gmail.com to gain access.
- Once clone the repository, modify the buildout.cfg as followed
[sources]
Nimrodrestapi = git https://yournamehere@bitbucket.org/jhtngu/nimrod.restfulweb.git branch=addresources
nimrodrpcdaemon = git https:// yournamehere @bitbucket.org/jhtngu/nimrod.rpcdaemon.git branch=addresources
-
Execute “python bootstrap.py” to setup the environment. This requires setuptools installed.
-
Execute “./bin/buildout” to clone and install necessary packages, including Nimrod Web service.
-
Install any missing dependencies as suggested by the build process.
-
Modify configuration files in the “etc” folder accordingly.
Install the Web portal
-
Install Liferay 6.1 (http://sourceforge.net/projects/lportal/files/Liferay%20Portal/6.1.1%20GA2/). The recommended location is: /var/www.
-
Follow Liferay instructions to install with Postgres DB (https://www.liferay.com/community/wiki/-/wiki/Main/Quick+Installation+Instructions)
-
Go to Liferay market and install Private Plugin Installer (https://www.liferay.com/marketplace/-/mp/application/15474932)
-
Install Vaadin into Liferay (https://vaadin.com/wiki/-/wiki/Main/Integrating+Vaadin+7+with+Liferay)
-
Install Nimrod portlets, which are available at: https://bitbucket.org/hoangnguyen177/nimrodportal2. Or contact hoangnguyen177@gmail.com for compiled version.
-
Install Nimrod portlets
Configure the portal and the Web service VM
From NeCTAR dashboard, make sure the port of the Web service (8081 by default) is accessible by the Web portal and Nimrod ports (40000 - 41000) are accessible by all.
Launch
Launch the Web portal first:
cd /var/www/liferay-portal-xxxx/tomcat-xxx/bin; sudo ./startup.sh
Then launch the Web service:
cd \~/nimrod.webservice/bin; ./supervisord;
Plan file web editor
Instead of using a text editor, the Nimrod Portal provides a simple friendly GUI for users to develop plan file for Nimrod/G experiments.

How to access it
Interested users can register for an account using their AAF credential at the following page (will need to be updated later): http://vm-203-101-224-118.qld.nectar.org.au/
The portal provides a friendly web interface for users to define, execute and monitor their experiments. For users who have existing Nimrod experiments, they can upload the plan files. User can also create new experiments using a simple GUI. Input and output files can be uploaded and downloaded using the web interface. For technical supports and learning to use Nimrod, please contact Minh Dinh and/or Hoang Anh Nguyen.
Configuration guide
Configuring Nimrod/G
Nimrod/G installation comes with two configuration files, both located in $NIMROD_INSTALL directory:
-
nimrod.cfg - Configuration values contained within can be overridden by a user level configuration file of the same name, which may be located in $HOME/.nimrod/ directory, or by an immutable configuration file described below.
-
nimrod.immutable.cfg - Configuration values contained within will override any other configuration, either user or system level.
Most of the configuration values can be left as is but some may be changed to match the system requirements.
Each configuration file may contain following sections:
-
email - used to configure email settings. This is used to report experiment completion.
-
nimserver - configures Nimrod/G component called Nimrod Server. Nimrod/G uses executables called Agents to execute jobs on remote resources. Agents use Nimrod Server to communicate with database as well as to copy files to and from remote locations.
Most of the configuration can be left as is. It is important however to ensure that default_port_range configuration value has a range of ports that can be reached by outside networks. When it starts, Nimrod Server will select a first available port from that range and will use that to listen for incoming connectinos from Agents. If the port it selects is unreachable, no jobs will run.
For example (port will be selected anywhere between 30000 and 31000 inclusive):
nimserver: {
default_port_range: '30000,31000'
key_path: $user_dir + '.nimserver'
remote_suffix: $remote_suffix
remote_key_fname: '.nimserver' + $nimserver.remote_suffix + '.pub'
port_path: $user_dir + '.nimport' + $nimserver.remote_suffix
remote_port_fname: '.nimport' + $nimserver.remote_suffix
}
-
actuator - configures resource actuators, components that control how resources are used. It can be used to change how often actuators poll database to see if there are any work they need to do. Configuration can apply to actuators for all resource types, but can also only apply to a specific resource type.
-
azure - configure azure resource settings. Can be left as is.
-
ec2 - configures ec2 resource settings. Can be left as is
-
generate - configures generate subcommand. This subcommand is used to parse the plan file and create another files that contains a cross-product of all parameters. Some of the settings include limits on how many jobs single experiment can have, or how long a parameter name can be.
For example:
generate: {
max_jobs: 100000
param_len_limit: 56
}
Configuring Nimrod/K
There is no Nimrod/K specific configuration.
Configuring Nimrod/O
A comprehensive manual for Nimrod/O can be downloaded from:
It contains information on how to configure Nimrod/O.
Technical blueprint
To date, Nimrod tools are deployed through several Nimrod portals stationed at Monash University, Griffith University and The University of Queensland. These portals provide the machinery to automate the tasks of formulating complex experiments and workflows, and execute them across a variety of computing resources including NecTAR VMs. In particular, we ran several projects to test the migration of scientific software to HPC platforms, including the NeCTAR research cloud, to provide enhanced utility for the following research projects.
Terrestrial Ecosystem Research Network (TERN)
Supporting the creation and execution of sensory data analysis using Nimrod portal to access available computing resources in the NecTAR cloud.
CVL Symmetric Model Creation
Coupling Nimrod to perform expensive computations efficiently and integrating visualization library to enable examination of intermediate models.

MARXAN
Coupling the MARXAN web portal with Nimrod to provide access to HPC and cloud resources.

Troubleshooting
There are multiple points of failure that are possible when running Nimrod/G experiments:
- Problem with executables (applications) that Nimrod/G is trying to execute
These will be reported back to database. In scenario like this is highly possible that all jobs will fail because of it. However the problem can be environmental in which case it will only fail on a particular resource or even a particular machine on that resource.
- Problem with remote machines where Nimrod Agents are running
These kind of problems occur when a particular machine on a computational resource is not working correctly. There are many reasons this may occur, which includes missing libraries, faulty hardware etc.
If the agents manage to start then these are easy to identify. Nimrod Agents will fail the jobs and record which host the job failed on. Listing failed jobs, and seeing that all failed on a particular host will indicate a problem with that host.
- Firewall issues preventing Nimrod Agents connecting back to Nimrod Server
If Agents are perpetually stuck in pending/queued state, it usually indicates that they cannot connect back to Nimrod Server. One reason is that there is a faulty host and Agents never start, and second reason is that firewall on either host is preventing those Agents connections.
There are number of commands that can be executed to collect information that may help identify the issue:
- Get reported errors
$ nimrod geterrors <exp_name>
- Check if there are any agents running on resources
$ nimrod getagents <exp_name>
Output returns a list of resources where each line has the resource name and agent information in following order:
-
Agents that have stopped running (cleanly)
-
Agents that are still running
-
Agents that have been submitted to a remote queue
-
Agents that have been created in database, but not submitted to a remote queue
-
Agents that have failed to start. Some agents may fail to start but won't be reported here. This will occur if firewall is blocking the connections.
-
Check the progress of experiment and see if there any failed jobs:
$ nimrod enfapi <exp_name> jobstatus
- If there are failed jobs, get errors for all failed jobs:
$ nimrod enfapi <exp_name> getjobinfo all error
Support
Administration
Please contact Hoang Anh Nguyen or Minh Dinh for the Nimrod Portal
Technical Support
All queries regarding the for the Nimrod Portal and WorkWays portal, please contact Hoang Anh Nguyen or Minh Dinh
Learning to use Nimrod or integrating Nimrod into your internal service
Please contact Minh Dinh regarding learning to use Kepler and Nimrod. For consultation on how Kepler and Nimrod can be applicable for specific research fields, please contact Minh Dinh.
Contact
Dr Minh Dinh
QCIF - eResearch Analyst
Reserch Fellow - Research Computing Center (RCC)
Email: m.dinh1@uq.edu.au
Mr Hoang Anh Nguyen
Email: hoangnguyen177@gmail.com
Glossary of Terms
[^1]: Nimrod_Portal is a Nectar allocation that consists of up 120 compute cores. It is designated for deploying Nimrod services and conducting Nimrod runs. It is an independent testbed for new users to trial Nimrod and its tools
Was this article helpful?
That’s Great!
Thank you for your feedback
Sorry! We couldn't be helpful
Thank you for your feedback
Feedback sent
We appreciate your effort and will try to fix the article