TABLE OF CONTENTS
- Requesting an allocation
- Prerequisites
- Service endpoint
- Creating S3 credentials
- Configuring client tools
The Pawsey S3 Object Storage Service provides large-scale storage for research data, hosted by the Pawsey Supercomputing Research Centre in Western Australia. Your files (called objects) are stored in buckets, which work much like folders, and you can access them from anywhere on the internet. The service uses the widely supported Amazon S3 interface, so you can use it with any S3-capable client, tool or library. It is built on Ceph, with the S3 interface provided by the RADOS Gateway (RGW).
This article explains how to request an allocation of Pawsey S3 storage and how to use it: the endpoint to connect to, how to create S3 credentials, and how to configure common client tools. For an overview of object storage on the Nectar Research Cloud, see the Object Storage article.
Requesting an allocation
Pawsey S3 storage is in addition to the object storage included in the Resource Bundles, and is requested separately.
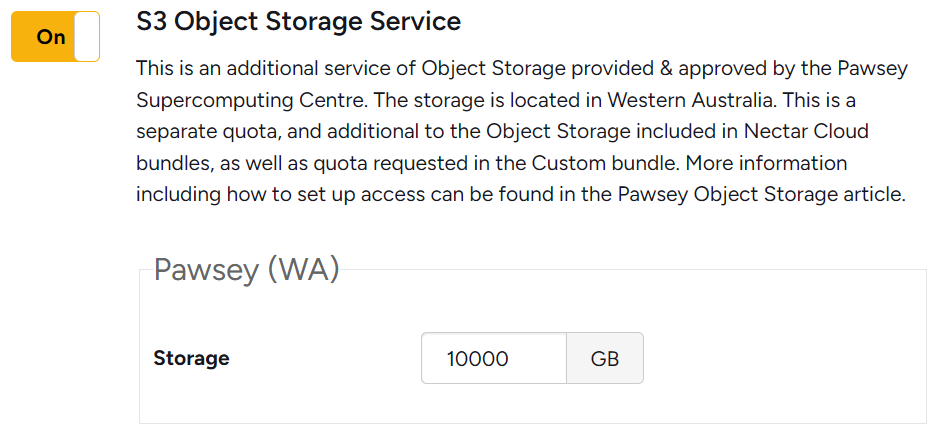
To request an allocation, enter it in the Allocation request form under STEP 2: Cloud resources, 2. Location Specific Resources on the Nectar Dashboard. For example, if you require 10 TB of storage (equivalent to 10 000 GB), toggle On the S3 Object Storage Service and enter 10000, as shown in the following screenshot:
Prerequisites
- An approved allocation of Pawsey S3 Object Storage for your project (see Requesting an allocation above).
- The OpenStack command line client, installed and authenticated with your Nectar credentials. See Getting Authenticated for API Command Line use.
You only need the OpenStack command line client once, to create your S3 credentials. After that, all access to the storage is with those credentials and an S3 client of your choice.
Service endpoint
All access to the service is via HTTPS through the following endpoint:
https://nectar-s3.pawsey.org.au
Configure this as the S3 endpoint (sometimes called the host or server) in whichever client you use. The service is not part of Nectar's Swift object storage, so Swift clients and the Dashboard's Object Store panel do not apply here.
Creating S3 credentials
The service authenticates with S3-style credentials: an access key and a secret key. In OpenStack these are called EC2 credentials.
You can create the credentials yourself using the OpenStack command line client, while authenticated to Nectar:
$ openstack ec2 credentials create
+------------+----------------------------------+
| Field      | Value                            |
+------------+----------------------------------+
| access     | <access-key>                     |
| project_id | <project-id>                     |
| secret     | <secret-key>                     |
| user_id    | <user-id>                        |
+------------+----------------------------------+
The access and secret values are what you need to configure your S3 client. The credentials are linked to the Nectar project you are authenticated to when you create them, so if you belong to more than one project, check that you are working in the project that holds your Pawsey storage allocation.
You can list your existing credentials at any time:
$ openstack ec2 credentials list
If a set of credentials is no longer needed, or you suspect it has been exposed, revoke it:
$ openstack ec2 credentials delete <access-key>
Configuring client tools
Any S3-compatible client will work with the service. The examples below show two popular command line tools, s3cmd and rclone. In each example, replace <access-key> and <secret-key> with the values from your EC2 credentials.
Bucket names are shared by all users of the service, so a common name like data or backup may already be taken by someone else. Choose distinctive bucket names, for example by including your project name as a prefix.
s3cmd
s3cmd is a command line tool for uploading, retrieving and managing data in S3-compatible storage. Install it from your operating system's package manager; the package is named s3cmd in most Linux distributions and in Homebrew on macOS.
Create a configuration file at ~/.s3cfg with the following contents:
[default]
access_key = <access-key>
secret_key = <secret-key>
host_base = nectar-s3.pawsey.org.au
host_bucket = nectar-s3.pawsey.org.au
use_https = True
You can then create a bucket, upload and download objects, and list your buckets (the s3cmd how-to has more examples):
$ s3cmd mb s3://my-bucket
$ s3cmd put dataset.tar.gz s3://my-bucket/
$ s3cmd ls s3://my-bucket
$ s3cmd get s3://my-bucket/dataset.tar.gz
rclone
rclone is a command line program for managing and synchronising files across many storage backends, including S3. Follow the rclone installation instructions for your operating system.
Add the following to your rclone configuration file at ~/.config/rclone/rclone.conf, creating the file (and directory) if it does not already exist:
[pawsey]
type = s3
provider = Ceph
access_key_id = <access-key>
secret_access_key = <secret-key>
endpoint = https://nectar-s3.pawsey.org.au
You can then use the pawsey remote with the usual rclone commands (the rclone S3 documentation covers more options):
$ rclone mkdir pawsey:my-bucket
$ rclone copy ./dataset pawsey:my-bucket/dataset
$ rclone ls pawsey:my-bucket
sync command can keep a local directory and a bucket in step. Be careful with rclone sync, as it deletes files at the destination that do not exist at the source.Was this article helpful?
That’s Great!
Thank you for your feedback
Sorry! We couldn't be helpful
Thank you for your feedback
Feedback sent
We appreciate your effort and will try to fix the article